Welcome to the LightWave Forum
Forum Moderators: CHMedia Forum Coordinators: Kalypso
LightWave F.A.Q (Last Updated: 2023 Mar 27 3:17 pm)

Subject: Need help


Well i have made a little progress by myself.I deleted that strange area like cube that i mentioned in my first post,using wings3d,and save the mesh as an wavefront obj.
But now how can i apply the texture to the obj??The only file that i have from doom is TGA file (i think for photoshop)with UV map.

I started typing out a workflow that hopefully would help you along, but about 10% in I realised that, without any knowledge of how Lightwave works, completing this seemingly simple task would take too much guidance to write down in a single forum thread. I also lack the skills to help you achieve this in the most efficient way possible to be honest.
I hate to be unhelpful, but you're better off with Google and Youtube to get this figured out. Look for tutorials on game model UV mapping. Open the .tga file in Pixlr if you don't ahve Photoshop and see if you can make sense of it. UV mapping is something you need to learn, not something you just do.
Here's what I had written before I decided it made more sense to let you figure it out yourself:
Use the Polygon selection tool to select the polygons that youw ant to apply the texture to. Press the space bar to turn your T-shaped cursor (point selection mode) to a diagonal line (edge selection mode) and press space again to turn it into an X-shape (polygon selection mode). A selected polygon shows up with a yellow outline and a perpendicular dotted line coming form the centre of your selected polygon.
Once you've selected the polys you want to apply a texture to, press Q. This will allow you to name your group of selected polys and turn said group into a "surface".
Bottom right, where it says W T M C S, select T and the choose "New" where it says "(none)" next to it. This will create a UV projection of your poly group. Select UV Texture in any of your four view windows. I usually choose "Top" and turn that into my UV View.
This surface then needs a UV map applied to it. Press F5. Then press the "T" button next to colour (next to the square that says "E").
Where it says "Projection", change "Planar" to "UV".
This should at least help you on your way. Or so I hope. Good luck!
Privacy Notice
This site uses cookies to deliver the best experience. Our own cookies make user accounts and other features possible. Third-party cookies are used to display relevant ads and to analyze how Renderosity is used. By using our site, you acknowledge that you have read and understood our Terms of Service, including our Cookie Policy and our Privacy Policy.
ΗιFirst of all i am a Poser user,and have no skills to Lightwave.For many years after Doom3 game i am looking for οbj models from that game.Last week i have found a way to extract models from Doom3 to Lightwave.
I was looking espacially for the Marines combat helmet.This one:
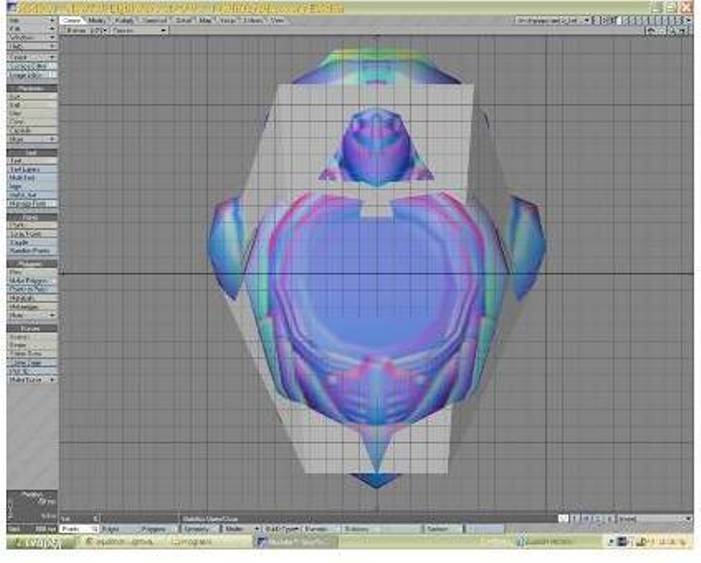
The problem is this.When i import to Lightwave or poser the mesh obj from doom i have this extra polygons and i dont know how can i delete this polygons.
The helmet looks like this :
I would like to put this helmet to my personal scenes.Can anyone help?How can i import this helmet to poser without these extra polygons??